Figment walkthrough – Full guide and puzzle solutions
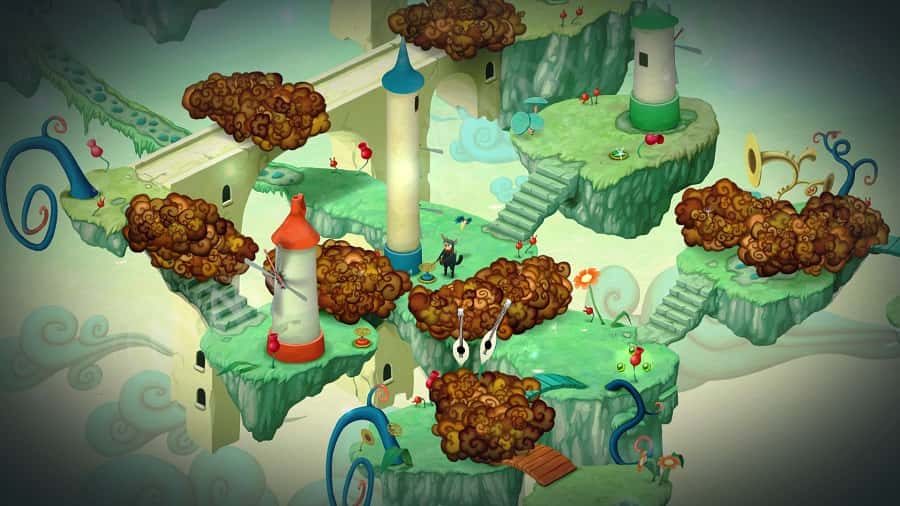
If you need help playing through Figment, hopefully our walkthrough will help you out. This wonderful little adventure from Bedtime Digital Games is set in a surreal dreamland and has plenty of puzzles for you to solve in order to progress.
While most of those puzzles are fairly straightforward, it’s the type of game that can stump you if you’re unprepared, so we hope our Figment walkthrough will keep you on the right track. You can use the guide wholly, or you can use the table of contents below to jump to the section of the game you need help with. We’ve broken the guide down by area.
Bear in mind that this guide is currently a work in progress, which means the second half of our Figment walkthrough is currently missing. We’ll update as soon as possible.
Outer Cerebrum
- Follow the path to the right of your house, then go up the pencil path. Interact with the button to make a second pencil path appear. You’ll eventually reach an ice machine. It needs a battery to make it work.

- Head back down both pencil paths then move to the right. You’ll find a battery that’s powering a windmill. Take it, and go back to the ice machine.
- Stand next to the ice machine’s battery socket and open your inventory. Use the orange battery you picked up. This will power up the ice machine.
- Pick up the ice dropped on the floor, then go back to your house.
- Someone has stolen your scrapbook — and your drink! — when you get back to your house.
- After the cutscene, follow the Nightmare by jumping on the moving platform then heading right.
- When the Nightmare throws ‘despair’ — a black orb which creates a whirlwind — you’ll need to dodge through it in order to pass.
- Keep going, and the Nightmare throws a monster. You can’t fight it, because you’ve lost your sword. It’s up on a ledge, but the elevator needed to reach it isn’t working.
- From the broken elevator, head upwards. You’ll eventually reach another lift. Take the metal disc from this one, and make your way back to the broken one.
- Use the metal disc on the broken elevator, then stand on it to move to the upper platform. Interact with your wooden sword to take it.
- Head back down the elevator, and take the metal disc out of it again — we’ll need it elsewhere.
- Follow the path down and defeat two enemies with your sword on the way. You can only attack when their head hits the ground: stand still until they’re about to attack then move out of the way.
- Keep moving until you reach a house. Use the metal disc on the elevator and stand on it to move up.
- Follow the path and go down the stairs (collect the health orbs from the tree first when prompted).
- Head upwards and hit the switch twice until a pencil path appears in front of you.

- At the other side of the pencil bridge, hit the switch twice to move the bridge to the top. Walk across the new path and take the blue orb — it’s a battery.
- Go back and press the switch twice more to move the bridge to the far right side. Walk across it, and place the blue battery in the battery socket. Keep following the path.
- Want to get the optional Remembrane orb? Flip the switch to start the platform moving. Head back the way you came, taking the battery out as you pass. Move the switch so you can cross the middle bridge and follow the path down until you meet the moving platform at the other side. Use it, and place the battery in the socket. This will create a bridge to the Remembrane, and also allow you to quickly get back to where you were.
- Head upwards, following the stone path.
- You’ll have a brief visit from the Nightmare here, and some enemies to defeat. Once they’re all dealt with, the path will reappear. Keep moving. Exit to Cerebrum City.
Cerebrum City
- Follow the path to the right.
- When you reach some buildings, use the pencil stairs to head upwards.

- Move forward then head up a second, smaller set of stairs. From here follow the path down and up until you reach the roof of the building. Go left, and up the tall, swirling staircase of pencils.
- After the cutscene, take the seedling.
- Head all the way down to the bottom of the building, moving right. Cross a stone bridge to the right and you’ll reach a fertile patch of soil.

- Use the seedling from your inventory on the soil. Climb over the leaf that sprouts to reach the next platform.
- Keep moving upwards.
Freedom Promenade
- Keep moving upwards until a short cutscene kicks in.
- Keep moving until you catch up with the Plague Nightmare. Avoid the smoke bombs he throws at you.
- Once he’s ran off, turn the handle three times until the windmill is facing the wall of smoke, allowing you to get past.

- Keep moving, going right past the red windmill (we’ll need to come back here with a battery soon).
- You’ll have to defeat an enemy — watch out for the lines of mud it fires.
- Keep going until you reach a dead end. There’s a red battery and a green battery to take here.
- Head back up to the windmill and power it with the red battery. Rotate it with the handle to get rid of the smoke.
- Follow the path until you reach a green windmill. Use your green battery to power this. You can’t rotate this one though – it’s missing a handle.
- Move forward and you’ll see a double windmill. Use the handle here to point it upwards, allowing you to go up a new path. Watch out for falling teeth.
- You’ll see a handle stuck in the scenery – hit it with your sword to free it, and pick it up. Head back the way you came.
- Use the handle on the green windmill. Turn it to remove the smoke blocking the path to the left.

- Head up the caterpillar path to the left. Follow it down until you read a red battery — take it.
- Go all the way back to the double windmill and across the path with the falling teeth. There’s a red windmill here – place your new red battery in it. You can now move down a new path to the right.

- Keep moving down the path until a cutscene kicks in.
- Time for a miniboss. The Plague Nightmare will fire smoke bombs at you. Avoid them. Every third one of them won’t explode immediately – quickly get close to it and hit it with your sword to fire it back at him. Before his health bar is empty he’ll run away.
- Go up the stairs to where he was stood to take the rope with hook.
- Head back down and cross the red bridge.
- Hit the plant on the edge of the island to extend it, then use the rope with hook on it. Interact with the handle to lower the hook. Now, wait for the worm to come out of the apple below before interacting again to raise it. This will make a hot air balloon appear at the side of you.
- Get in the balloon and choose to exit area.

Bright Planes
- Wait for the platform to move across to you, then walk onto it to move to the right.
- When at the other side, hit the tree with tuning forks just at the right time so it traps the moving tail underneath. It might take a few attempts!

- When you’ve got it, ride the tail down.
- Move to the right: there’s an enemy here, but each time you defeat it it’ll simply come back. Stand near the central tree, the one with a flute in its branches so the enemy fires its attack at the tree. Eventually, the flute will fall. Pick it up.
- Go back to the right and use the catapult to get back up to the top.
- This time, take the large ramp heading up. At the top, use the flute on the broken bridge.
- Cross over and hit the handle stuck in the tree to knock it out. Take it.
- Go back down the long ramp and go back down the snake’s tail. Here, you’ll find a base to place the handle.

- Turn the handle once and use the catapult.
- Go across the bridge to the right and defeat the enemy. Use the lift and take the orange battery.
- Go back down the lift, and move left. Go up the large blue staircase.
- Place the orange battery in the battery socket.
- Turn the windmill’s handle twice so it clears the path going upwards.
- Take the path until you reach a working elevator. Take the metal disc.
- Go back to the windmill and use the disc on the elevator to the left of it.
- Take the orange battery out of the windmill’s socket, then use the elevator.
- At the top, take the disc from the elevator.
- Move right, and get ready to defeat two enemies.
- Use the metal disc on the broken elevator at the top, then go down.
- Take the metal disc then move right across the bridge. Use the disc on the lift here and go up.
- Put the orange battery in the socket. Head up the green bridges to enter the next area.
Overpass of Originality
- Head forward and up the staircase.
- Cross over the large white bridge and pick up the piston. At the other side is an accordion bridge with a trumpet at the side of it: it needs three pistons to work.

- First, go up.
- Cross the floating teeth-shaped platforms to the left until you reach an area with an enemy.
- It’s another one of those enemies that keeps coming back every time you defeat it. You need to use its attack to clear three patches of flowers: one blocking a bridge, one blocking a handle, and one blocking a battery. Simply stand near the flowers and move out of the way at the last minute.
- Cross the bridge at the top to take the battery, then place that in the windmill’s battery compartment. Then, use the handle to rotate the windmill to clear the smoke blocking a pathway at the bottom.
- Follow the pathway and move downwards using the moving tooth-shaped platforms.
- When you reach the end, take the blue battery then go down in the elevator.
- You’re back where you started. Go across the white bridge again and this time, head down.
- You’ll reach a screen with several windmills and lots of clouds of smoke.

- Turn the blue windmill twice so you can access the red windmill.
- Turn the red windmill’s handle so it’s blowing downwards. Turn the blue windmill so that’s blowing downwards, too.
- You should now be able to access the small island below the red windmill. Pick up the handle stuck on a tree (hit it with your sword, remember).
- Now, turn the blue windmill so it’s pointing towards the green windmill. Place the handle next to the green windmill and turn it so it’s pointing upwards, clearing the smoke on the bridge.
- Turn the blue windmill so it’s pointing towards the red windmill, then turn the red windmill so it’s pointing towards the blue windmill.
- Next, turn the blue windmill so it’s pointing upwards towards the bridge.
- Return to the red windmill and turn that so it’s pointing upwards, too. The white bridge should now be clear: cross it and take the seedling from the other side.

- Turn the red windmill so it’s pointing towards the blue windmill, then turn the blue windmill so it’s pointing towards the red windmill.
- Turn the red windmill again so it’s pointing down, then turn the blue windmill so that’s pointing down too. You should now be able to reach the bottom island: place the seedling in the fertile soil.
- Cross over the plant and keep going to reach the next area.
Gardens of Creativity
- Go down the elevator and take the metal disc when you’re at the bottom.
- Cross the red bridge. There’s an enemy here, but ignore it for now.
- Cross the caterpillar bridge and use your disc on the lift. Go up and hit the tree: a nut will fall out. Go back down and pick the nut up.

- Make sure you pick the metal disc back up from the lift. Cross over the caterpillar bridge again.
- In the area with the enemy, place the nut on a stone to the bottom of the island.

- Stand on it until the shadow of the enemy appears. Move out of the way just in time: the enemy’s head will make contact with the nut, cracking it to reveal a dry seed. Pick it up.
- Go down the path to the south east.
- At the bottom of here is a pot: place your seed in the pot.
- Follow the path up and use the metal disc on the elevator to ride it upwards.
- Up here, take the green battery from one socket and place it in the other.
- Go back down the elevator and back to where the pot is. Interact with the switch nearby: the seed will now sprout.

- Take the seedling.
- Go back up to the main island with the enemy, and take the staircase to the southwest.
- Just at the bottom of the staircase is a patch of fertile soil: place the seedling here.
- Cross the leaf and follow the path. You’ll find a tree with another nut in it. Again, hit it to knock the nut out and pick it up. Be careful, though: there are two enemies in this area.
- Now you need to repeat the same process as before: place the seed on the rock and get the big enemy to smash it. Then take it and place it in the pot. If you left the water system on, activating the switch should sprout it straight away.
- Pick up the seedling.
- Go right and use the lift. Replace the green battery onto the upper socket.
- Now, go back to the main island with the enemy and this time take the north east path upwards. You’ll have to defeat an enemy here.
- Use the handle to turn the windmill so it clears the smoke in the northeast direction. Don’t worry about clearing the bridge.
- Go back where you came from and use the lift. Take the path you’ve just cleared. You’ll find a tree with yet another nut. Hit it, and take the nut.
- Remove the battery from the windmill and place it in the water system again. Time to repeat the process: Get the enemy to crack the nut, then place the seed in the pot to water it.
- You should have two seeds in your inventory now. Before you continue, go back up the lift and take the battery. Go down the lift, and take the metal disc.
- Go back down the red staircase where you planted the first seed. Cross the leaf, and you’ll see another spot of fertile soil. Place a seedling here.

- Cross over the new leaf. Prepare to defeat two enemies.
- Pick up the poison pot in the centre of the island.
- Use a seedling on the next fertile soil patch, just over to the left.

- On the next island, place the green battery in the windmill socket. Cross the bridge to take the Remembrane.
- Remove the battery, then go back to the main island with the big enemy. Place the poison on the rock and let the enemy hit it. Pick up the piston.
- Head up, back to the elevator where you originally came from and return to Overpass of Originality.
Overpass of Originality (again)
- Move upwards past the area with the multiple windmills. Place the two pistons you have now in the trumpet.
- Keep moving north and go across a red bridge.
- Over here, place a blue battery in the socket – you should have one in your inventory. This will clear the smoke, allowing you to keep moving forward.
- Go up the white slope to enter a new area.
The Symphonic Lobe
- Follow the path, avoiding the shooting plants as you go.
- After the short cutscene, go up the red bridge and turn the windmill’s handle to blow the smoke off the stone bridge.
- Cross the stone bridge to the right.
- Use the handle to turn the reflector so it bounces the flowers poison ball to the right, clearing the plants blocking your way forward.

- Follow the bridge until you reach the next area — somewhere filled with shooting plants.
- Make your way to the first area on the left, where you’ll find a reflector. Turn it so it’s reflecting upwards.

- Go up and take the next path to the left until you reach an area with musical instruments. Leave them for now but we’ll come back.
- Take the blue bridge and pick up a handle. Press the button to make a quick path down to where you started.
- Go back across the blue bridge and this time take the orange bridge — follow the path and turn the handle of the windmill to clear some smoke. You’ll find a Remembrane.
- Now, go back past the area with musical instruments into the area with all the shooting plants. Make your way up, following the path round until you reach another reflector.

- Turn this one so it’s reflecting to the right. Go back around the path, and this time go right, across a small white bridge.
- Place the handle you found on the broken handle base, then turn the reflector so it’s reflecting down.

- Now, make your way to the reflector underneath, and turn it so that one is reflecting to the left.
- Go back to the musical instruments – you should now be able to adjust all three handles. The flute should be one notch high, the drum two and the xylophone three. Get the tune right and a rattle will fall out of the tree. Pick it up.

- Go back to where you started, until you reach the junction where a red bridge leads to a yellow windmill. Go up there, then turn the windmill so it’s blowing towards the left.
- No, cross a second red bridge until you reach a snake curling around a hill, with a large bird’s nest on top.
- Affix the rattle to the end of the snake’s tail, then pull the snake’s tongue. The bird will flow away, and the windmill will cause the third piston to blow off its back. Pick up the piston, then go back to the previous area.
- You’ll be briefly back in Overpass of Originality. Head down and put the third piston in the trumpet. You can now cross the accordion bridge.
Fulfilment Slope
- Follow the path until you reach the Plague Nightmare.
- It’s time for another battle with him — but you can’t simply fire bombs back at him like before — he simply dodges by jumping on the nearby flowers. So we need to remove those flowers.
- Move all the way to the right, and take the blue battery.

- Put the blue battery in the windmill just to your left: this will clear the smoke to the right of the Plague.
- Walk into this area and the Plague Nightmare will throw his bombs at you, which will kill the flowers.
- Take the battery back out of the windmill.
- Now, go all the way to the left and put the battery in the catapult. Use it.
- Pick up the handle and ride the snake tail down.
- Take the red battery and ride the snake tail the rest of the way.
- Turn the wheel to move the catapult and use it again.Put the handle on the base – it controls a water system. You can’t do anything with this yet, but we’ll come back.

- Ride the snake back down.
- Place the red battery in the windmill to the left of the Plague Nightmare to clear the smoke.
- Once again, go stand near the flowers so Plague throws a smoke bomb near them, which will kill them.
- Now, with no flowers to jump onto, it’s time to start attacking him. Wait until one of his thrown smoke bombs doesn’t explode, and hit it back at him.
- You won’t damage him, but he’ll move backwards on his platform.
- Move to the left and use the catapult. At the top, use the handle twice to set the water device in action, dumping water over the Plague Nightmare’s head.
- Ride the snake tail down, then pick up the Plague’s mask.
- You’ll automatically be taken back to Cerebrum City.
Cerebrum City (again)
- Take the path heading left.
- Make your way up to the ‘Mind Gate’ right up the top of all the stairs – it’s the purple swirling door. Throw the Plague’s mask into it.

- Pick up the gear left by the mayor, then make your way down the swirling staircase.
- Head to the leftmost rooftop, where you can walk across a stone bridge.
- Over here, place the gear on the gear shaft.

- Walk across the gear bridge to the left and follow the path to reach a new area: Clockwork Junction.
This Figment walkthrough is a work in progress. The rest of the guide will be coming ASAP.
Did you find this guide helpful? Please consider making a one-off donation to GameSpew. All money raised goes directly towards the running costs of the site and helps us continue to make guides, walkthroughs and more content.