Tormented Souls 2 walkthrough: Complete guide with full puzzle solutions

Available on PS5, Xbox Series X/S and PC, Tormented Souls 2 is the sequel to the cult indie survival horror, further continuing the exploits of Caroline Walker. After the events of the first game she’s trying to enjoy life with her younger sister, Anna. But with Anna having an uncanny ability to bring dark things into the world simply by drawing them, there’s some work to be done. Cue a trip to Villa Hess, where Caroline aims to seek help with Anna’s problems. But it’s there that a new nightmare begins.
Being a sequel, Tormented Souls 2 is very similar to its predecessor. That means it’s a traditional survival horror experience, with multiple locations to explore, plenty of puzzles to solve, and a variety of enemies to encounter along the way. Some of those puzzles are truly tricky, too, and so you might need some help to avoid getting too frustrated. That’s where we come in. We’ve out together a helpful walkthrough for Tormented Souls 2, complete with solutions for all puzzles. So, it’s up to you: you can dip in and out of it as needed, or keep it open to speed up your progress through this dark and dangerous adventure.
This walkthrough for Tormented Souls 2 is now complete, and includes information on how to achieve the best ending in the game as well as full puzzle solutions.
Convent
- After the intro, you’ll awaken to find Anna missing. Exit the room, head down the corridor and enter the room in which you’ve just seen her taken to.
- Now you’ll come to in another room with needles stuck in you. Ouch. Explore the room and grab the Christ Book near the stretcher and the Thumb Tack from the cork board.
- Open your inventory and examine the Christ Book. Combine it with the Thumb Tack, using it on the left arm of Christ to open the book. Inside is the Flower Key. Take it.
- Use the Flower Key to open the locked door in the room.
- Make your way to the Staff Room on the first floor and pick up the Pliers.
- Head to the Bell Tower and go down the stairs to find a corpse. Use the Pliers on the cage covering the corpse’s stomach to get the Lighter.
- Now that you have Lighter, equip it for some light and then head to the North Corridor to turn on the power to the elevator. The lever is just across from the Lady Chapel.
- Use the elevator and make your way down to the basement. Grab the Hammer after your encounter with Joseph in the Crematorium.
- Head back to the North Corridor and use the Hammer on the padlock preventing you from opening the door to the Courtyard.

- Before entering the Courtyard, let’s head back to the Bell Tower to get a new weapon, the Shotgun.
- Go the Bell Tower and head up the stairs, using the Hammer to break the vases blocking your path. Climb the ladder at the top.
- You’ll now need to solve a puzzle to get the Shotgun from its glass container.
How to get the Shotgun in Tormented Souls 2
At the top of the Bell Tower in Tormented Souls 2 you’ll find a powerful weapon – the Shotgun. The problem is, it’s protected by a glass case which you can’t even smash with your Hammer.
Investigate the case to find a clue as to how you can destroy the glass. Basically, you need to use noise to break it. There are four bells surrounding you, and if you hit them with your Hammer they’ll make a noise according to their size. To break the glass case and solve the puzzle, you need to hit the second smallest bell first, then the largest, then the smallest, then the second largest. The glass case will then shatter, allowing you to grab the Shotgun.
- Now, having grabbed the Shotgun, head back and enter the door you opened to the Courtyard.
- Make your way to the gallows in this area and pull the lever nearby to drop the corpse in the cage. Go to where the corpse dropped and use the Pliers to obtain the Saw Blade stuck in it.
- Pass through the Courtyard and make your way to the Refectory. There you’ll find a cabinet you can move, and there you’ll find a Saw Handle. Combine the Saw Handle with the Saw Blade to get the Saw.
- Now head to the kitchen and open the freezer. There’s a corpse inside that’s holding something. Use the Saw to cut off the corpse’s hand.
- Locate the cooker in the kitchen and use your Lighter to light it. Use the frozen hand on top of the cooker to melt it. You can now take what it’s holding: the Cryptex.
How to solve the Cryptex puzzle in Tormented Souls 2
After melting the frozen hand in Tormented Souls 2 you’ll find yourself in possession of the Cryptex, a strange device which if you examine will discover has seven rotating rings. Rotate these rings and you might recognise the icons that are revealed – they’re chess pieces.
Chances are you’ll have found a clue to this puzzle already in the Calefactory Room – a chess mat. On the back of it are a sequence of marks: these indicate how various chess pieces can move. You need to decipher which chess piece correlates to the movement depicted – this provides you with the code to the Cryptex. The answer is: Knight, Castle, Bishop, Queen, King, Pawn, Knight. Once you’ve input the code into the Cryptex it will open, revealing the Crown Key. Take it.
- Now that you have the Crown Key, had back into the basement and open the locked door down there with the key to gain access to the prison area.
- Move through the prison area until you find a power box. Use your Pliers on the barbed wire keeping the box shut to remove it. Now that the power box is open, it’s time for another puzzle.
How to solve the power box puzzle in Tormented Souls 2
When you reach the prison area in Tormented Souls 2 you’ll find that it’s not only very dark, but also all the cells are locked and you can’t open them because the power is off. After finding the power box and opening it by using the Pliers on the barbed wire, you’ll find numerous switches you can fiddle with, each with a couple of pictures above them. But what do they mean?

You’ll find a clue to this puzzle in one of the cells that has been broken open. Be careful, though, as you’ll be ambushed by an enemy after grabbing it. Basically, it shows that you want to turn the switches in the power box to images that can be created in line with the grid. That means you’ll want to turn the first switch to the right, the next three to the left, and the last one to the right. Once you’ve done that, return to the area where the cells are and pull the lever on the walkway. The power will now come on, allowing you to open the cells and proceed.
- Progress further into the prison until you find the Cursed Book resting on a pedestal. Take the book and then place the Christ Book where it was.
- Leave the prison and return to the Crematorium. Give the Cursed Book to Joseph and he’ll give you the Museum Key.
- Make your way to the Museum. You need to use the Museum Key to open the door. Use it on the middle bolt first, then the left, and finally the right. You’ll then be able to interact with the lever to unlock the door.
- In the Museum, head downstairs and grab the Jade Cross from the area behind the stairs.
- Go through the door at other end of the bottom floor to enter the Torture Museum.
- Pass through the Torture Museum to the basement, where you’ll find both a Telephone Dial and a telephone book page which provides a clue to an upcoming puzzle.
- Go back through the Torture Museum and Museum, then make your way to the Library.
- Use the Telephone Dial on the phone in the Library. You’re now ready to tackle another puzzle.
How to solve the phone puzzle in Tormented Souls 2
There’s a phone in the Library in Tormented Souls 2, but you initially can’t use it because it doesn’t have a dial. This can be found once you’re able to access the Torture Museum, and it’s there you’ll also find a telephone book page which provides a clue as to the number you should call on it.
Having gone back to the telephone in the Library, use the Telephone Dial on the telephone to fix it. As for the number you should call, examine the telephone page: combine the lines on both sides of the page to get the number you should call, which is 3890*. A drawer will open nearby containing a Jade Disc. Take it.
- With the Jade Disc in your possession, go into your inventory and examine the Jade Cross you picked up earlier. Turn it around and you’ll see it’s missing a disc. Lucky you just found one, eh?
- Combine the Jade Cross with the Jade Disc. You now need to press the buttons on the back of the Jade Cross to align the discs so that a square shape is formed with the lines. Press the following switches: right, down, left, right, right.
- Once the Jade Cross has been completed, go to the door of the Chapter House and insert the Jade Cross into it to open it. Grab the Plant Sprayer from inside the Chapter House.
- Go back to the Torture Museum. There’s a locked gate in there: use your Hammer to break the lock on it. You’ll find a mirror surrounded by candles. It’s time to solve another puzzle.
How to solve the mirror candle puzzle in Tormented Souls 2
Deep in the Torture Museum in Tormented Souls 2 you’ll find a mirror surrounded by candles. It obviously has some significance – why would you be able to light the candle around it otherwise? But you might be at a loss as to what to do with it.
The clue to activating the mirror lies in the Museum you passed through to reach the Torture Museum. One of the pictures in there depicts a woman sat in front of a mirror; look closely and you’ll see it’s the very same mirror as the one in the Torture Museum. Look at the candles that are lit in the picture – that’s the solution you’re looking for.

You need to light the first three candles on the right hand side starting from the bottom, as well as the bottom and top candles on the left hand side. That’s five candles in total. The mirror will then be activated, allowing you to pass through it into a hellish version of the Torture Museum.
- In the hellish version of the Torture Museum, interact with the body on the table in the middle of the room and use the lever to pull it apart.
- Further explore the hellish version of the Torture Museum to find a statue holding a paper scroll. Use your lighter on the scroll to burn it.
- Exploring the hellish Torture Museum further still, locate another mirror which takes you to a secret area of the real world. Locate a bronze bull in this area and open it up to find a corpse holding a Stone Heart. Take it.
- Go back through the mirror you came from, entering the hellish version of the Torture Museum again, and then pass through the mirror to take you back to the normal Torture Museum.
- Examine the corpse on the table to get the Pipe. Combine this with your Shotgun in the inventory to upgrade it.
- Go to the museum and interact with the angel statue there. The stone scroll it was holding has now disappeared. Place the Stone Heart in the chest of the statue and it will start crying blood into the bowl below. Use the Plant Sprayer on the bowl of blood to fill it.
- Head back into North Corridor of the Convent, and go to the door to the Lady Chapel which has arms preventing you from opening it. Open your inventory and examine the Plant Sprayer filled with blood. Use the pump to pressurise it.
- Use the pressurised Plant Sprayer containing blood on each of the hands protecting the door to remove them. You can now enter, and take part in your first boss fight.
How to defeat the Iron Maiden boss in Tormented Souls 2

The Iron Maiden is the first boss you encounter in Tormented Souls 2, and after filling her with considerable lead you’ll discover that there’s more to putting her down for good. Firstly though, do just that: shoot the Iron Maiden repeatedly with your Shotgun or Nailgun, running away when she starts to swing her large weapon at you. Eventually she’ll go down on one knee, with the metal device covering her face opening. But what to do now?
Around the edge of the arena you’ll find a couple of corpses hung up, each one with a dagger stuck in them. Quickly grab one of those daggers, then go and insert it into the Iron Maiden’s face. In pain, she’ll then get up for another round of combat. Simply put her down again with either your Shotgun or Nailgun, then grab the other dagger and insert it into her face to finish her once and for all.
- Once the Iron Maiden is defeated, head up the stair in the Lady Chapel and explore the room beyond to find an upgrade for the Nailgun.
- Go back into the Lady Chapel and leave via the other door on the bottom level to eventually emerge outside.
Town
- Head through the town and enter the Butcher Shop,
- Go into the cellar of the Butcher Shop and grab the Mall Back Entrance Key from a corpse there.
- Leave the Butcher Shop and use the Mall Back Entrance Key to enter the Mall across from it.
Mall
- In the Pharmacy, pick up the polaroid picture – you’ll need this to solve a puzzle in a short while.
- Move through the mall and turn on the power at the opposite end from which you entered.
- Go to the bathroom stalls and pick up the Automatic Nailer weapon.
- Return to the Pharmacy and interact with the mini fridge there to start a new puzzle
How to open the Pharmacy mini fridge in Tormented Souls 2
After turning on the power in the mall in Tormented Souls 2 you’ll finally be able to open the mini fridge in the Pharmacy, which of course contains something you’ll need to progress. You’re not able to just walk up to it and open the door, though – you need to adjust some dials so that the right colours are displayed to open a lock.
The clue to this puzzle lies in the polaroid you found in the Pharmacy earlier. On the back of the polaroid are three splodges of colour, each with A+B etc. written in them. The answer is what combined colours make those displayed on the polaroid. Turn the dials so that the first colour on the minifridge is blue, the second is yellow, and the third is red. The mini fridge will then open, allowing you to take the Dojo Key that’s inside.
- With the Dojo Key in your possession, head to the Dojo and enter it. Inside you’ll find the Box Cutter.
- Leave the Dojo and then exit the Mall.
Town
- Use the Box Cutter on the public telephone. Take the Coins.
- Go back into the Mall.
Mall
- When back in the Mall, head to Arcade and enter it.
- Use the Coins with the UFO catcher machine. Catch a bear (this might take many, many attempts).
- Examine the bear – its belly is apparently very soft. Use the Box Cutter to cut the bear open. Inside you’ll find the Gold Ring.
- Go the chained man in the lower area of the mall and place the Gold Ring on his hand. He’ll disappear, allowing you to access a new area of the town.

Town
- Start making your way through town, heading towards the Processing Plant. You’ll meet Miguel along the way.
- Head up the large set of steps when you reach them and enter the Processing Plant at the top.
Processing Plant
- Make your way through the Processing Plant.
- After going up some stairs, enter the first door you encounter on the right. In this room, climb the ladder at the end to enter the Surveillance Room and grab the Metal Bike Parts.
- Backtrack and go further down the corridor. Enter the Dormitory and then go into the Bathroom. You’ll meet Joseph again. Grab the Crowbar from the corpse.
- Leave the Dormitory and grab the map for the Processing Plant from the small room across from it.
- Pick up the Acid Test Tubes from the bench near the model boat.
- Head back down the stairs you came up earlier. Equip the Crowbar and destroy the crates that are blocking access to the elevator behind them. Take the elevator down to the basement.
- In the basement, head towards the stairs leading down into B2. Destroy the crates with your Crowbar to clear the way after lighting the candles nearby.
- After going through the door at the bottom of the stairs you’ll find yourself in the Freezer Room. Find the cell that has a picture hanging on a wall. It’s time for a puzzle.
How to solve the picture puzzle in Tormented Souls 2
Making your way through the Processing Plant in Tormented Souls 2, you might find your progress halted upon reaching the Freezer Room. There’s a picture hanging on a wall in cell in this area which you’ll probably guess is hiding something, but what, and how do you reveal it? The answer lies in a diary you can pick up nearby.

Examine Brother Juan’s Diary and on the last page you’ll find that it reads “I have hidden the switch that opens the secret corridor behind my daughter’s heart.” So, with this information, interact with the picture hanging on the wall and click on the girl’s chest where her heart is. A secret door will open nearby, allowing you to progress further.
- Head down the secret corridor that you’ve just revealed and push the red button on the wall at the end. Enter the cell that it opens behind you.
- Grab the VHS Tape – Freezer on the bed in the cell.
- Backtrack all the way to the Conference Room on the first floor. Use the VHS Tape – Freezer with the VCR Player in this room and hit play.
- Interact with the projector screen to enter the Freezer Room (Past).
- Make your way to the hidden corridor and enter the cell at the end, where you originally found the VHS Tape – Freezer. You’ll have to hit the switch on the wall again to open it.
- In the cell, move the locker/wardrobe to cover the vent.
- Leave the cell and go back to where you entered Freezer Room (Past). Interact with the camera to return to the Conference Room in the present.
- Head back to the cell in the Freezer Room again. You’ll find Anna. Kind of.
- Grab the Light Bulb near the bed, then interact with the door to the cell and use your Nailgun on the button on across from the door to open it.
- Leave the Freezer Room and go back up the stairs to the first level of the Basement.
- Go to the Reception and pick up the Acid Test Tubes. In the corridor beyond the Reception, use the Light Bulb in the socket on the wall. Push the nearby switch in corridor to turn on the light.
- Destroy the crates near the light with your Crowbar, then take the elevator at the end of the corridor down to B3.
- In this area, you need to power up yet another elevator so you ca reach the Underground Docks. Interact with the panel at the end of the walkway for another puzzle.
How to power up the Underground Docks elevator in Tormented Souls 2
Exploring the basement floors in the Processing Plant, you’ll eventually want to reach the Underground Docks. You can’t, however, as the elevator to it isn’t powered up. Luckily for you, there’s a panel nearby that, with some fiddling, can get the power working again. Interact with it, of course.

Looking at the wires in the panel, you need to rotate the dials so that the elevator box has all the available power from the cables feeding into the panel from the bottom. It’s easier than it sounds. Simply rotate the top middle dial once, and the top right dial three times. The power to the elevator will then be restored.
- With the power to the Underground Docks elevator restored, interact with the switch next to it to summon it your level, then take it down.
- Open the nearby gate and take the Cassette Player from the corpse.
- Now you need to go all the way back to the Upper Wing on the second floor.
- Go to the end of the corridor and near the model boat you’ll find a locked door with a keypad next to it. It’s puzzle time.
How to solve the Processing Plant keypad puzzle in Tormented Souls 2
On the second floor in the Processing Plant you’ll find a locked door with a keypad next to it. To make matters even worse, interact with the keypad and you’ll find that it doesn’t have any power. Thankfully that’s easily rectified. You should have a Cassette Player in your inventory thanks to your journey to the Underground Docks. Examine the Cassette Player in your inventory and remove the batteries from it by clicking on the battery cover.
Now you have some batteries, interact with the keypad at the side of the locked door. Examine its battery panel to open it, then insert the batteries you took from the Cassette Player. The keypad will now have power, but what’s the code? The clue to the code is in the Surveillance Room which you visited earlier. There are some numbers pinned to a corkboard in that room: 1795, but the 9 is one line lower than the rest. That’s because instead of entering a 9 you should replace it with the number that’s above it on the keypad. So, the code is 1765. Enter it and then press the big red button to unlock the door next to the panel.
- Before you go through the door you’ve just unlocked. Remove the batteries from the keypad again – you’ll need them later for another puzzle. Don’t worry – the door will remain unlocked.
- In the room beyond, the Dining Room, head down the stairs and into the central area. Interact with statue of diving suit to get the Metal Plate – Eye.
- Upon trying to leave the central area, the diving suit will come to life. Deal with it to remove the barrier on the door.
- Leave the Dining Room and head to the Offices. Pick up the Acid Test Tubes and Metal Plate Base.
- Go back to the Dining Room and then enter the Kitchen.
- First head upstairs and grab the Crossbow Frame from the shelf. Combine the Crossbow Frame with the Metal Bike Parts to make the Crossbow. Unlock the door to create a shortcut, then go back down the stairs.
- There’s a trolley you can move in the corner of the lower area of the kitchen. Pull it back to reveal a trapdoor with a ladder that will take you down to the basement.
- In the basement, go down the corridor past the Decontamination Office and grab the Acid Test Tubes and the Cassette Tape – Confession from the strange cells at the end. You’ll have to interact with the nearby machine to open them first.
- Go back the way you came and unlock the door that leads to the rest of the Basement that you explored earlier. Locate the voice activated door in the middle area. It’s puzzle time again.
How to open the voice activated door in Tormented Souls 2
In the Basement of the Processing Plant in Tormented Souls 2 there’s a voice activated door that you’ll need to somehow get through. Luckily, by this point you should have a Cassette Player in your inventory that you found in the Underground Docks, as well as the Cassette Tape – Confession you’ve just picked up nearby.

Put the batteries back in the Cassette Player if you haven’t already done so, then hit the eject button and insert Cassette Tape – Confession. Play the tape and you’ll find that it reveals the password for the voice activated door. Interact with the voice panel at the side of the door and interact with it, then examine the Cassette Player in your inventory and hit the play button to start the recording. Exit the examination screen, and just as the voice starts to say “The password is…” hit the red button on the voice panel. Time it right, and the recording should say “Long Pig” as the voice panel starts to listen, unlocking the door.
- Go through the now unlocked door and head to the Waste Disposal room. Use the ladder in this room to get to the Warehouse.
- (Optional) If you want another upgrade for the Shotgun, summon the elevator in the Warehouse and use it to travel back to the Dining Room. There you find a Shotgun Pipe sitting on a table. When you’re done, return to the Warehouse.
- In the Warehouse, grab some more Acid Test Tubes while making your way to the panel a the other side of the room. You need to use this panel to clear the path of cages so you can progress. In other words: it’s puzzle time.
How to solve the Warehouse cage puzzle in Tormented Souls 2
Upon reaching the Warehouse in Tormented Souls 2, you’ll find your progressed blocked by some cages. Lucky for you, there’s a panel nearby which allows you to move them. Interact with the panel and you’ll be in control of a crane which you can operate with the button on the left hand side.
To solve the puzzle and create a path you can move through, pick up the two cages in the lower right hand corner of the screen and move them upwards to the wall. Then, move over to the three cages on the left an grab the one at the top. Don’t bother dropping it anywhere, just keep it held in the machine. Use the picture above for reference. You can now go down the ladder in the room and explore the lower area.
- In the lower area of the Warehouse you’ll find yet another puzzle to solve: another one of those mirrors with candles surrounding it.
How to solve the Warehouse mirror puzzle in Tormented Souls 2
In the lower level of the Warehouse in Tormented Souls 2 you’ll find another one of those mirrors you encountered earlier in the game, surrounded by candles. Once again you need to light the correct candles to activate it, allowing you to pass over into an eerie “Other Side”. But which candles should you light?

The clue to this puzzle is in plain sight if you interact with the mirror: 03:45:20. That’s a time, and it signals which three candles should be lit with your lighter. Imagine the candles are a clock face: light the one that’s at the 3 position, the one that’s at 9, and the one that’s at 4. The mirror will now be activated.
- Now the mirror is activated, pass through it. In Warehouse (Other Side), grab the Mutant Toy.
- Pass through to Waste Disposal (Other Side), and place the Mutant Toy on the table in the furnace where the giant crab creature is.
- Head back to the warehouse and use the mirror to go back to the real world.
- Go to Waste Disposal – there’s a not a creature in the incinerator area which you need to burn. Puzzle time.
How to solve the incinerator puzzle in Tormented Souls 2
After passing through an “Other Side” area in the Processing Plant in Tormented Souls 2, you’ll be left with the task of incinerating a grotesque creature to obtain an item that’s inside it. The problem is, as it is, the incinerator isn’t burning properly. So, as ever, it’s up up to you to get it working again.
You’ll find the controls for the incinerator in the far side of the Waste Disposal room, and nearby there’s also a sign on the wall showing how the valves in a nearby device should be set to make sure it works properly. Basically, all of the valves should be set in a vertical position. Interact with the panel with the valve controls and you’ll find there’s an added complication: when you rotate one valve, some others move too. You need to get all the valves into vertical position.
Interact with the valves in the following order: bottom left, top middle, bottom middle, middle left, middle right, top right, top left, bottom left. Alternatively, fiddle with them yourself until they’re all in the vertical position. Once that’s done, go to the incinerator controls nearby, hit the button to close the incinerator doors, then hit the burn button. Once the creature inside is toast, hit the open button, then go and retrieve the Metal Plate – Spiral from where it was laying.
- After grabbing Metal Plate – Spiral from the incinerator, head all the way back to the Dining Room. It’s time to complete another puzzle involving the four pictures found on the walls here.
How to solve the Dining Room picture puzzle in Tormented Souls 2
Making your way through the Processing Plant in Tormented Souls 2, you’ll pass through the Dining Room numerous times. You might have noticed that there are four pictures hanging on the walls in this room, one of which has a green light which comes on when you stand in front of it. The others have light above them, too, but making them come on requires a bit more thinking.

To solve the puzzle, examine the pictures. You need to perform the action that’s being displayed in each one in front of it to get the light above it to light up. So, spin around using the tank controls in front of the painting of a young woman performing a pirouette, hold your lighter up in front of the painting of the woman holding an antique lamp, hold your crossbow in front of the paining of a woman aiming with a bow, and swing your hammer in front of the painting of a man forging in his workshop. The statue of a woman in the central area of the dining room will then move a little, allowing you to take the Manual Jack it was holding.
- Now that you have the Manual Jack, make your way to the Underground Docks again.
- In the Underground Docks, locate the dead shark and use your Crowbar to open up its mouth a little, then place the Manual Jack in its mouth before interacting with it to open up the shark’s mouth even more. Grab the Metal Plate – Triangle that’s inside.
- Now you need to go back to the Decontamination Area on the first floor of the basement.
- In the Decontamination area you’ll find a wall with three devices on it: there are whet you insert the Metal Plates you’ve been finding into.
- First insert the Metal Plate – Eye into the device on the left, then press the red button three times to process it. Next place the Metal Plate – Triangle into the device in the middle and press the red button three times to process it. Finally, place the Metal Plate – Spiral into the device on the right and press the red button three times. You’ll need to combine the Metal Plate – Spiral with the Metal Plate Base first.
- You’ll now be able to open the large door to the Slaughter Room nearby by clicking on the handle to rotate it. Make your way through the Slaughter Room to encounter another boss.
How to defeat the Harvester boss in Tormented Souls 2

Towards the end of your time in the Processing Plant you’ll enter the ominous-sounding Slaughter Room. And it lives up to its name, as it’s there you’ll encounter your next fiendish boss to overcome: the Harvester. Like the Iron Maiden, the Harvester can’t be killed with bullets alone, so how do you put this fiendish creature down for good?
The answer likes in the harpoon equipment scattered throughout the room. On one side of the room is a corpse with numerous harpoons stuck in it: grab one of these harpoons and then load up the harpoon gun across the other side of the room when you get a chance. Next, concentrate on shooting the Harvester with all that you’ve got, avoiding it getting too close to you so that its melee attacks don’t cause you harm. Eventually it will be injured, causing it to move at a snail’s pace.
Take this opportunity to use the crank-operated device in the room that arms the harpoon gun, and when everything is set, lure the Harvester into the harpoon gun’s path before pressing the button on the control panel in the room to fire it. Simply repeat until the Harvester is defeated. You’re then able to pick up the Circular Saw Blade that it drops.
- With the boss dead and the Circular Saw Blade in your possession, go down a ladder in the Slaughter Room into the Reception area. There you’ll find a Chainsaw. Combine the Chainsaw with the Circular Saw Blade to get the Rusty Chainsaw.
- Head back to where you entered the Processing Plant and use the Chainsaw on the block of wood so that you can open the door and leave.
Town
- Back in town, move away from the Processing Plant and go back down the multiple sets of stairs you previously climbed to reach it.
- Head further into town and enter the underground tunnel where there’s another door to unblock with your Chainsaw.
- Enter the door and move through the sewer until you reach the Cemetery.
Cemetery
- In the Cemetery, head left, then up, then left again to find a tree with the Club Key hanging from it. Take the key.
- Now head back the way you came and head down to enter another area of the Cemetery. Grab the Bat Dial from the tomb next to the locked gate. You’ll have to open the coffin inside.
- Leave the tomb and cross over the bridge across from it. Enter the Cemetery Office nearby to find a map of the area on a board.
- Go through the hatch at the back of the Cemetery Office to enter the Burial Grounds. Grab the Constellation Disk Piece from the pedestal.

- Go back to the Cemetery Office then leave the via the door and start making your way towards the Cemetery Grounds, taking a detour along the way to go up some stairs and grab the Turtle Dial from one of the tombs at the top.
- In the Cemetery Grounds, grab the Dog Dial from the coffin along the upper edge.
- Make your way to the central structure in the Cemetery Grounds, opening a gate and going up some stairs to enter it, then go down some stairs in the middle of it and open a coffin there to find the Bird Dial.
- Continue to the bottom area of the Cemetery Grounds and then head to the old tomb in the bottom right corner. Use the Club Key to open it then take the Constellation Disk inside.
- Head back along the bottom edge of the Cemetery Grounds, making your way to the Cemetery Entrance. Along the way, open and enter a small tomb. Inside you’ll find a puzzle involving the dials you’ve been finding.
How to solve the animal dials puzzle in Tormented Souls 2
Making your way through the Cemetery area in Tormented Souls 2, you’ll have been finding dials with various animals on them. These become useful when you pass through the structure in the middle of the Cemetery Grounds and enter a small tomb, where there’s a strange device in which you can use them. But how do you solve this troublesome puzzle?

Interact with the device and then examine the text where it says “The Four Animals” for a clue. You need to place the four animals in order, as well as angle them correctly. You need to place the Bird Dial first and have it angled diagonally downwards as if it’s swooping. Next is the Turtle Dial, and that needs to be upside down as it’s on it’s back. The Bat Dial comes after that, and that also needs to be upside down as it’s sleeping. Finally you have the Dog Dial, and that needs to be angled diagonally upwards as it’s pouncing.
With the the dials in place and correctly angled, the device will open, revealing a powerful Hand Cannon weapon for you to take.
- Leave the tomb and carry on heading towards the Cemetery Entrance.
- In the Cemetery Entrance, head to the old mausoleum that’s locked with a device that will fit a circular object nearby. It’s time for another puzzle.
How to solve the Constellation Disk puzzle in Tormented Souls 2
When you first enter the Cemetery area in Tormented Souls 2, you’ll like come across an old mausoleum that’s locked. It seems like you can’t use a key to open it, either, but there is a strange device nearby that appears to accept a disk-shaped object. What you require is a Constellation Disk and Constellation Disk Piece, and luckily for you, both should now be in your inventory.
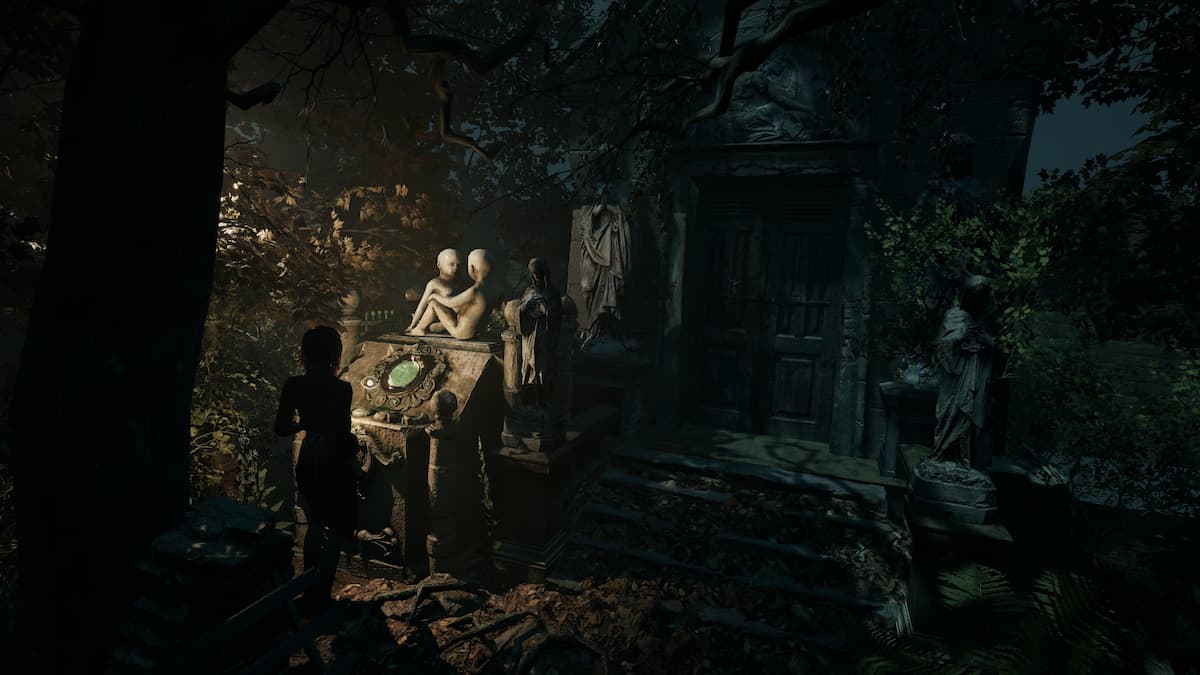
To solve the puzzle, go into your inventory and combine the Constellation Disk with the Constellation Disk Piece. You then need to examine the completed Constellation Disk and rotate the three dials that it consists of to replicate the Gemini constellation. The clues here are the twins on top of the device as well as the twin graves in the cemetery. Gemini is Latin for twins, you see?
In any case, to recreate the Gemini Constellation, move the outer dial 5 times, the middle dial 2 times, and the centre dial 7 times. Once that’s done, place the Constellation Disk in the device near the old mausoleum, and its door will unlock.
- Now that the old mausoleum is unlocked, enter it and take the Metal Detector from the lockers that are inside, as well as the Morbid Illustrations that are pinned up on the wall.
- You now need to use the Metal Detector on the locations shown in the Morbid Illustrations.
- Leave the old mausoleum and go to tree nearby where you got the Club Key from. Equip the Metal Detector and search there to find the Bronze Octagon.
- Next go to the wooden bridge you crossed earlier. Search that area with the Metal Detector to find the Silver Octagon.
- Now find the statue of a woman pointing in the Cemetery Grounds. Start searching with your Metal Detector from there to find the Gold Octagon.
- After finding the last octagon, the Cemetery will turn darker than it was before, and zombies will start climbing out of the ground. As if you didn’t already have enough to deal with!
- Head to the upper area of the Cemetery Grounds and find the fancy grave the looks like somebody laying in bed in the centre. Interact with it to start yet another puzzle.
How to solve the Cemetery Grounds grave puzzle in Tormented Souls 2
Making your way through the Cemetery area in Tormented Souls 2, you’ll find a large and rather fancy grave in the upper half of it. Interact with it and you’ll see that there’s a mechanism missing some parts. These can be found once you’ve obtained the Metal Detector and followed the clues to locate a number of Octagon-shaped pieces. By now you should have them, but how do you solve the puzzle?

Firstly, interact with the grave. To solve the puzzle you need the octagons in the device to spell out PEDRO, but not all of the pieces you’ve obtained have all the letters you need, so you have to place them strategically. So, insert the Gold Octagon in the left slot, the Silver Octagon in the middle slot, and the Bronze Octagon in the right slot. Once you’ve done that, hit the red button above each octagon to turn them and spell out PEDRO. Once that’s done, a panel will open up on the back of the grave, and interacting with it will take you down into the Catacomb.
- After you’ve taken the elevator down, head through the door and start making your way through the Catacomb area.
- In the large room at the end of the Catacomb, interact with the coffin and take the Marble Sword from the corpse. Try to leave the room and the entrance will be sealed. Kill the enemies to unseal it.
- Now backtrack and enter the Burial Chamber. Take the ladder down to the lower area to find yet another puzzle to solve.
How to solve the Burial Chamber puzzle in Tormented Souls 2
It’s a relatively small area, but there are numerous puzzles to solve in the Cemetery as you make your way through Tormented Souls 2. Thankfully the one in the Burial Chamber is the last of them, and now you have the Marble Sword from the Catacomb you’re able to solve it.
Take the ladder down in the Burial Chamber, and you’ll find four statues around the outer edge. One of them is missing a sword, however, so first interact with that one and use the Marble Sword you’ve found to complete it. Now, however, you need to turn the swords on each of the statues in the right direction to complete the puzzle. The answer to this puzzle lies in a book in the upper area of the Burial Chamber, which mentions the Four Horsemen of the Apocalypse and the times they arrived.

Basically, the sword of the statue depicting Conquest needs to be pointing towards 12 o’clock, the sword of the statue depicting War needs to pointing towards 6 o’clock, the sword of the statue depicting Famine needs to pointing towards 3 o’clock, and the sword of the statue depicting Death needs to pointing towards 11 o’clock. You can identify which statue is which by the clothes they’re wearing. The Conqueror looks regal, for example, while Death is wearing a cloak. Press the red buttons in front of each statue to turn the swords, and when they’re all in the correct positions, an elevator should activate.
- Now that the elevator in this area is active, take it down and move froward to trigger a scene. Now it’s time for another boss fight.
How to beat the Coffin boss in Tormented Souls 2

As ever, you think you’re done with an area and then something terrible happens and a big bad boss appears. In the case of the Cemetery, you fall into an area full of corpses and have to deal with a boss that looks like a coffin. That’s Tormented Souls 2 for you. But how you defeat this nightmare brought to life?
The key to beating this boss is focusing on the enemies that spawn alongside it. Take them down, and the Coffin will fall on its back for a while, allowing you to move in and shoot its soft innards. The trouble is, the enemies that spawn during the fight ill grow more powerful and numerous. Still, after clearing a four or so waves of enemies and attacking the Coffin’s soft underside, it will be defeated for good.
A good tactic here is to use guns to take down the waves of enemies, then switch to a melee weapon to hit the Coffin with to save some valuable ammo. Once you’re done, use the mirror in the area to leave the mass grave and continue.
- With the boss dealt with, make your way through the Mass Grave area until you find the Detachable Flashlight sitting on a pedestal. Pick it up.
- Examine the Detachable Flashlight in your inventory and you’ll find that it needs batteries. So, remove the batteries from your Cassette Player, then place them in the Detachable Flashlight which will prove to be much more useful.
- Turn on the flashlight via your inventory – you now have light while using weapons! Destroy the nearby crates with your Crowbar and take the ladder up to return to the Burial Chamber.
- Take the ladder up from here rather than the elevator and you’ll find yourself in the mausoleum in the Cemetery Entrance.
- Leave the Cemetery via the way you originally came and return to the Sewer Walkway.
Town
- Now that you have the Detachable Flashlight, you can better explore the Sewer Walkway. Destroy the crates that were previously blocking your path about halfway through.

- Squeeze through the gap to reach the Cave.
- Deep in the cave you’ll encounter Joseph again. After speaking to him, grab the Sledgehammer nearby.
- Keep making your way through the Cave, and you’ll eventually find another gap to squeeze through, taking you back to the Sewer Walkway. Use the Sledgehammer to destroy the wall blocking your path.
- Make your way back to the Butcher Shop, going through the Mall on the way. In the Butcher Shop Cellar, there’s another wall for you to destroy with your Sledgehammer.
- Climb the ladder behind the wall you’ve just destroyed and make your way through the tunnel. When you find the Maintenance Room there’ll be a scene with Miguel.
- After the scene leave the Maintenance Room via the door on the lower level and further explore the tunnel. You’ll eventually find a ladder that takes you to the School District.
- Head towards the School.
- (Optional) Before you reach it, explore the house in the top area of the map to find Cassette Tape – Session 47. You’ll need to take the batteries from your Detachable Flashlight and put them in the Cassette Player again to listen to it.
- Enter the School.
School
- Once you’ve entered the school, head strait across the lobby and up the stairs, entering a room on the left ahead to grab the School Map from the photocopier.
- Go back and head to East Corridor B, going through the School Library. Grab the Music Sheet from the Art and Music Rooms.
- Now go to the Kindergarten and grab the Xylophone on one of the tables.
- Leave the Kindergarten and make your way to the Schoolyard. Grab the Metal Spoon.
- Go back to East Corridor B and stand near the sculpture of Beethoven. It’s time to solve a puzzle.
How to solve the Beethoven Xylophone puzzle in Tormented Souls 2
Having reached the School, you’re quite far into Tormented Souls 2, but the puzzles keep coming. The first you can solve in the School revolves around a Xylophone found in the Art and Music Rooms. It’s where you’ll find some clues to the puzzle, too, in the form of a Music Sheet, and a display showing Xylophone notes.

Examine the Music Sheet and you’ll find that it’s for Sonata No. 14 ‘Moonlight’. That’s by Beethoven. That’s your clue that you should perhaps perform it near the sculpture of Beethoven found in East Corridor B. What’s more, turn the sheet around and you’ll find that FACE DEAD has been written on it in blood. Eerie, but perhaps also the notes you should play.
Stand to the left side of the sculpture of Beethoven, where he’s holding his horn, and do just that. Examine the Xylophone in your inventory, combine it with the Metal Spoon and play the notes FACEDEAD, which convert to purple, yellow, green, light blue, red, light blue, yellow, red. A compartment will open up. Take the 7A Fuse that’s inside.
- Once you have the 7A Fuse, leave East Corridor B and go to Generator Room. Interact with the Fusebox and place the 7A Fuse in the right slot to power the elevator.
- Now go to Classroom 103 and take the Apple Seeds on the desk near the corpse.
- Return to East Corridor B and use the now powered-up elevator to go to the 2nd floor.
- Make your way to the far end of the Textiles Classroom and grab the Computer Lab Key. You’ll have to fight your way out of the room.
- Go back to the elevator. Take it down to the basement and unlock the Computer Lab door with the Computer Lab Key.
- Pass through the Computer Lab into the Janitor’s Room. Here, first open the gate and make your way through the long tunnel to unlock the hatch at the top of the ladder at the end, creating a shortcut back to the lobby.
- Go back through the tunnel, pass through the Janitor’s Room into the Basement, then take the stairs up to East Corridor A.
- Use the Crowbar to remove the planks blocking the door to the Playground. Enter the Playground and unlock the door at the other side, and make your way to the Generator Room again.
- In the Generator Room, remove the 7A Fuse from the elevator slot and place it in the 1st floor slot instead.
- Go back through the Playground to East Corridor A. You should now be able to get through the door that leads to West Corridor 1F.
- Enter Classroom 104 and take VHS Tape – Playground from underneath the TV. Did the cool scene with the pig-headed man make you jump?
- Now head to Classroom 102 – you’ll have to pass through Storage Room 102. Interact with the cabinet there and you’ll find that it’s locked. It has the name Helena on it though; is that a clue? It’s puzzle time.
How to solve the Helena cabinet cryptex puzzle in Tormented Souls 2
Making your way through the school in Tormented Souls 2 you’ll eventually reach Classroom 102. Here you’ll find a cabinet with the name Helena on it that you’ll probably want to open. You can’t, though, at least not yet, because there’s a puzzle to be solved. You see, to unlock the cabinet, you need to work out the correct code and enter it into the cryptex.

You’ll find the clue for this puzzle in Classroom 101, just next door. Head there and pick up Helena’s note, which when examined will give you some idea as to the code. The answer is: Book, Ruler, Compass, Sharpener. Once you’ve put in the code the cabinet drawer will open. Take the 7A Fuse that’s inside.
- Now that you have another 7A Fuse, make your way back to the generator room again. Place the new 7A Fuse in the elevator slot, and remove the other fuse from the 1st floor slot and put it in the 2nd floor slot.
- Make your way to the Art and Music Rooms. Use the VHS Tape – Playground in the VCR Player there, then interact with the screen to go into the past.
- In the Playground (Past), use the Apple Seeds on the pot to plant them, then drag the table under the dripping tap to water them.
- Return to the present and make your way to the Playground. Grab the Apple from the small tree that’s now grown.
- Go to Classroom 103 and place the Apple into the hand of the corpse there. Take the Snake Figurine from the drawer that opens.
- Take the elevator up to the 2nd floor. Make your way to Classroom 202 and make note of the symbols in the picture in the corner of the room if you wish. Note the hare on the blackboard, too.
- Now go to Storage Room 201 and grab the Insecticide from the locker. You’ll have to pass through Classroom 201.
- Unlock the door to the stairwell on 2nd floor to make a shortcut, then go to the Girls’ Restroom. You’ll find a cage containing something in one of the cubicles here which you can’t open yet, and another of those mirrors with candles around it. You know what that means: puzzle time.
How to solve the School mirror puzzle in Tormented Souls 2
There are many mirrors surrounded by candles in Tormented Souls 2, and as you’ll have discovered by now activating them allows you to move across to an eerie “other side” where things are a bit different. It stands to reason that you’d find one of these in the School area eventually, but just how do you activate it? The clue lies in some normal mirrors nearby.
Just across from the mirror surrounded by candles you’ll find three mirrors with marks on them. The marks symbolise the candles surrounding the supernatural mirror you need to activate, with the candles you should light having circles drawn upon them. The twist here, however, is that there are three mirrors with mathematical symbols between them. So, you should take the lit candles in the first mirror, add those in the second mirror, then subtract those in the third.
To solve the puzzle, you need to light the candle at the top of the mirror, as well as the two on the lower left-hand side. Once those are lit, the mirror will activate.

- With the mirror activated, head through to Girls’ Restroom (Other Side). From here, find your way to Classroom 202 (Other Side). Interact with the safe in this room to start another puzzle.
How to solve the School “Other Side” Safe puzzle in Tormented Soul 2
Visiting the “Other Side” during your time in the School in Tormented Souls 2, you’ll come across a safe in the eerie equivalent to Classroom 202. It appears you need to put in a code consisting on symbols to open it, but with just a picture of a snail on the blackboard nearby, you might be at a loss as to what the code it.
The clue for this puzzle is found in the real world version of Classroom 202 which you visited earlier. Remember those symbols in that picture you were advised to make note of? Those in conjunction with the drawing on the blackboard give you the solution. In the real world the drawing on the blackboard was a hare, while in the Other Side it’s a snail. The code, then, is the opposites of all the symbols in the picture. So, the peace symbol becomes war, and so on.

Enter the following symbols into the safe: Grenade, Fire, Male Symbol, Sun, Happy Mask. Once that’s done, pull on the handle to open it. There’ll be a dead bird inside which you won’t want. You’ll have to travel to Classroom 202 in the real world to claim your actual prize.
- After opening the safe in Classroom 202 (Other Side), don’t go back to the real world just yet. Instead, go down the stairs nearby and find the Director’s Office (Other Side). When you’re there, grab the Insecticide Sprayer (Empty) from the desk.
- Examine the Insecticide Sprayer (Empty) in your inventory and combine it with the Insecticide you found earlier to fill it.
- Now go back up the stairs and follow the walkway around to find Classroom 203 (Other Side). Take the Toad Figurine from the corpse in there.
- Now head back to Girls’ Restroom (Other Side). Before you pass back through the mirror, interact with the toilet surrounded by flies and use the Insecticide Sprayer (Filled) on it.
- Back in the normal version of the Girls’ Restroom, examine the cubicle which previously had a cage in it to see that it’s gone. Now you can grab the Fly Figurine.
- Head to Classroom 202 and take the Hawk Figurine from the now-open birdcage.
- Now make your way to the Science Lab. Interact with the wooden stand on the desk in the centre of the room to start another puzzle.
How to solve the animal figurine puzzle in Tormented Souls 2
You’ve covered most of the School area in Tormented Souls 2 now, and have gathered a number of animal figurines. That’s good, because you’ll need them to solve this puzzle which involves a wooden stand in the Science Lab.
The clue to this puzzle can be found on the blackboard in the Science Lab: “The strong will devour the weak.” So, you need to place the four animal figurines you have on the wooden stand, starting with the strongest at the top and ending with the weakest at the bottom. Place the Hawk Figurine at the highest point, then, with the Snake Figurine below that, then the Toad Figurine, and finally the Fly Figurine. A drawer will open. Take the Combination Key from inside.
- Now that you have the Combination Key, go back down to the first floor and make your way to the Director’s Office. It’s puzzle time yet again.
How to solve the Director’s Office puzzle in Tormented Souls 2
In the Director’s Office in Tormented Souls 2 there’s a locked door, and you need to pass through it to get to the Archives. You won’t simply find a key for that door, however, you have to get the Combination Key and then input the correct symbols into it to make it work on the lock. But how do you do that?
After obtaining the Combination Key from the Science Lab, return to the Director’s Office and examine the blackboard that’s in there. It has three symbols drawn on it: multiple circles, a thorny crown and a howling wolf. That’s your clue. If you examine the Combination Key in your inventory, however, you’ll find no symbols that match them. Instead, you have to look for symbols associated to them.

The wolf is easy: that’s the moon symbol, surely? The thorny crown’s not too bad either: that’s probably the cross. But the circles? Anyway, the correct code is: Female Symbol, Cross, and Crescent Moon. Examine the Combination Key and insert those symbols and it should be able to unlock the door in the Director’s Office.
- After putting the correct symbols into the Combination Key and opening the door in the Director’s Office, make your way through the Archives and enter the mysterious door at the end. You’ll find yourself in Hidden Room, and it’s time for a boss fight.
How to beat the Pighead boss in Tormented Souls 2

You’ve done nearly everything you need to do in the School now, so of course Tormented Souls 2 has another boss for you to defeat. This time it’s a creature with a pig’s head, armed with fearsome butchers knives. And as usual, simply filling it with lead isn’t enough.
To beat the Pighead boss in Tormented Souls 2, attack him with everything you’ve got while avoiding his attacks. His lunge is the worst, which you can avoid by running away from him if you have the room. Eventually he’ll be injured and go down on one leg for a short while. During that time, you need to position yourself in front of one of the electrical devices around the edge of the room.
When the Pighead boss gets back up, he’ll charge at you: simply move out of the way just before he reaches you and he’ll crash into the device, presumably doing him some real damage. Simply repeat this process two more times, making use of the other electrical devices in the room, and the Pighead boss will be no more.
- Once you’ve beat the Pighead boss, pick up the Pig Mask that’s on the floor. Head back to the Director’s Office for a scene.
- After the scene, make your way to the Computer Lab in the basement, using the nifty shortcut in the Lobby you opened up earlier.
- In the Computer Lab you’ll find another blackboard with some symbols on it. There’s a sunflower, a bow and arrow, and a moustache. These are clues for the Combination Key again.
- Examine the Combination Key in your inventory and change the symbols to Sun, Heart, and Male Symbol. You can then use the Combination Key to open a locker across from the Blackboard. Inside is a Recoil Spring.
- Open your inventory, examine your Hand Cannon and combine it with the Recoil Spring to upgrade it.
- Now make your way to the Janitor’s Room. Interact with the hand sticking out of the TV there and give it the Pig Mask. The door to the School will now be unblocked, allowing you to leave.
- Leave the School.
How to get the Good ending in Tormented Souls 2
As is common in games of this nature, there are two endings to obtain in Tormented Souls 2: one good, and one bad. And as you’d expect, you have to go out of your way a bit to get the good one.
If you want to get the good ending in Tormented Souls 2, you have to make an important choice at the end of the School area. Basically, you have to take steps to save Miguel. With him having a pretty bad cut on his neck, you need to think of something ingenious to heal him, and the answer is: Duct Tape. This can be found in the Convent, in the Dormitories. Go the Refectory and smash the weak wall there with your Sledgehammer to gain access to it. Make sure you do this before going to the Church, too.
Once you have the Duct Tape, return to the School, and instead of applying it directly to Miguel, head to the Girls’ Restroom on the 2nd floor. Here, use the mirror to pass through to the “Other Side”, and then make your way to the Director’s Office. There you’ll find a robot. Use the Duct Tape on the robot’s neck, and Miguel will inexplicably be saved in the real world. This will lock you into the good ending.
Of course, if you want the bad ending, you can ignore all of this and head straight to the Church instead. It’s up to you.
Town
- Now you’re out of the School, start making your way to the Church. Go through the door to reach it via the Train Station rather than returning to the Sewer.
- In the Train Station, enter the train via the door at the far side and unlock the other door to create a shortcut.
- Leave the train and pass through the building to return to the Commercial District.
- Now’s the time to return to the Convent if you want the good ending (see above). Otherwise, head to the entrance to the Church.
- Try the gate to the Church – it’s locked. Look like you need to use your Combination Key again. That means it’s puzzle time.
How to solve the Church Gate puzzle in Tormented Souls 2
You’re getting near the end of Tormented Souls 2 now that you’re heading for the Church, but that doesn’t mean the puzzles are letting up just yet. Try the gates to the Church and you’ll find that they’re locked, but that keyhole looks familiar. It’s yet another thing you can unlock with the Combination Key you’ve taken possession of, but of course you’ll need to enter the right symbols into it first.

Move away from the Church gates a little and you’ll find a hopscotch game on the pavement. In three of the squares are pictures – they’re the clues to the symbols you need to input into the Combination Key. The rose is often given as a gift of love, so that symbol is Heart. For the martial artist, the most appropriate symbol is Ying & Yang. And for the three men on camels, are they wise, perhaps? Maybe they’re heading for a star.
Examine the Combination Key in your inventory and change the symbols to Heart, Ying & Yang and Star. You should then be able to use the key to open the gate and gain access to the Church.
- Once you’ve opened the gate to the Church, go up the stairs and enter it.
Church
- After the scene upon entering the Church, remove the boards from the nearby door with the Corwbar and enter the Wake Room.
- Go through the door at the end of the room to reach Wake Room Storage and grab the Rubber Hose from the locker.
- Now return to the main room of the Church and find the elevator in the corner. It isn’t currently working, but you have what you need to fit it. It’s puzzle time.
How to fix the Church elevator in Tormented Souls 2
If you want to save your sister in Tormented Souls 2 and finish the game, you’re going to have to get the elevator working. Now that you’ve been to Wake Room Storage and grabbed the Rubber Hose, you have what you need, too. Well, along with some other items you’ve had for a long time now.

Next to the elevator in the Church is some kind of power box. Interact with it and you’ll see that it’s missing a component. Use the Rubber Hose in your inventory to connect the two pipes. That’s not quite enough to get the elevator running, however. You also need to use the Wire on the Rubber Hose, and then tighten the Wire with your Pliers. Do all that and the Rubber Hose will be held securely in place, allowing you to use the Church elevator as much as you like.
- With the Church elevator now working, take it up to the 2nd floor.
- Make your way around the upper level of the Church and enter Sacristy. Go down the stairs and pass through the Administrative Office, unlocking the door at the end. You’ll now be in the lower level of the Church again, but behind the gated area.
- Unlock the gates so that you can roam the lower level of the Church freely, then find a mirror surrounded by candles in the corner or the room. Time for another puzzle.
How to solve the Church mirror puzzle in Tormented Souls 2
If there’s one thing to say about Tormented Souls 2, it’s that it loves its mirror puzzles in which you need to light the correct candles. The one you find in the Church might just be the trickiest one of them all, too, as it’s surrounded by more candles than ever.
The clue to this puzzle is written on the mirror itself. “In those moments when the cross on his shoulders felt heaviest, it was then that the devil sought to extinguish the flame of his faith.” Additionally, throughout the lower level of the Church are numbered pictures depicting the stations of the cross. To solve this puzzle, you need to light all the candles that don’t depict Jesus being weighed down by the cross.
So, numbering the candles 1-14 starting with the one in the lower left corner and working up and around, light them all except candles 3, 5, 7 and 9. The mirror will then be activated.

- Now that the mirror in the Church is activated, head through it to reach Church (Other Side).
- Make your way through Church (Other Side) and enter Undercroft (Other Side). There, find a mirror and pass through it to reach Undercroft.
- In the Undercroft, there’s a door you can go through to create a shortcut back to the Church. When you’re ready to progress, find a large metal door in the Undercroft that has an eye engraved on it. There’s a message on the statue in front of it that reads: “Only souls brave enough to surrender wholly to the darkness can move beyond this path”.

- Extinguish the candles near the door, then stand in front of it and put away your Lighter/turn off your Detachable Flashlight. After standing in the dark for a short while, the door will emit a light and start to open. It reveals a corridor with an elevator that will take you down to the Bunker at the end.
- Take the elevator down to the Bunker and enter it.
Bunker
- In the Bunker, place your hand on the scanner to open the door.
- In the Generator Corridor, go up the stairs and enter the Bunker Office. Grab Sister Angelica’s notes.
- Go back to the main Bunker room and seek out the machine in the corner that contains red, yellow and green substances. It’s puzzle time.
How to solve the the Bunker Puppet Virus puzzle in Tormented Souls 2
The Bunker is the final area in Tormented Souls 2, but it has some more puzzles to you to overcome before Caroline’s ordeal is over. The first involves synthesising the Puppet Virus and injecting it into Caroline so that she can pass further into the bunker, But how do you do that?
The answer lies in Sister Angelica’s notes that you picked up from the Bunker Office. They contain a diagram that shows if you inject yourself with a substance that’s 6 parts red, 2 parts green and 1 part yellow, you’ll have a special version of the Puppet Virus that can be adapted to make you immune to Lucia’s controlling grasp.

So, head to the machine in the corner of the Bunker with the red, green and yellow substances and interact with it. Reduce them all to zero by using the buttons below each substance, then increase red to 6 units, green to 2 units, and yellow to one unit. You can then place your hand under the needle on the right and press the start button to inject yourself with the Puppet Virus. Just note that if you get the mixture wrong, you’ll die instantly. No pressure then.
- Now that you’re infected with the Puppet Virus, go back into the Generator Corridor. Just before going down the small set of stairs, go right and enter the Elevator Passage. Grab the Spark Plug from what looks like an operating table.
- Go back into the Generator Corridor and open the door down the small set of stairs with your hand.
- In the Generator Room, go up the ladder and then insert the Spark Plug into the machine.
- Go back down the ladder. First flick the red switch on the generator, then pull the large lever on the other side of it to turn on the power.
- Return to the Elevator Passage. Interact with the panel near the elevator to summon it to your floor. Take the elevator down to B3.
- In this B3 area, don’t bother going down the elevator at the end of the long corridor yet – it just leads to death. Instead, pay a visit to the Incinerator and grab the Laboratory Access Card from the corpse.
- Go back to the elevator you came down on and take it to B2. In the Rotunda Corridor, use the Laboratory Access Card on the panel, push the big red button and then enter the Laboratory.
- At the far end of the Laboratory, pick up the VHS Tape – Laboratory.
- Go back to the Rotunda Corridor and continue making your way around the curved passageway. Enter the Containment Ward via the door at the end.
- In the Containment Ward, take the elevator down at the other side of the room, then go to the cell at the end of the lower level and grab the Syringe (Empty).
- Take the elevator back up and then leave the Containment Ward. In Rotunda Corridor go through the door at the other end to reach Subject Containment.
- In Subject Containment, first take the ladder down and turn on the power near the Abomination, then go back up the ladder.
- Now climb the other ladder in this area. On the upper level, first push the button on the device in the central walkway to insert some kind of tube into the Abomination.

- Now go to the device with the green light on the other walkway, interact with it, then use the Syringe (Empty) on it to get Syringe (Filled).
- Make your way back to Subject Containment. Use the VHS Tape – Laboratory in the VHS Player, then pass through the projection to to access Laboratory (Past).
- In Laboratory (Past), find the chamber containing Caroline, then use the Syringe (Filled) on the IV bag at the side of it. Caroline’s Puppet Virus will now effectively be cured.
- Return to the present and make your way to the Elevator Passage. Take the elevator down to B3.
- In B3, go down the long Corridor and take the elevator at the end down to the Ancient Temple.
- Keep moving through the Ancient Temple to reach the Resurrection Chamber. It’s boss fight time again. The final boss, in fact.
How to beat the final boss, Nautilus, in Tormented Souls 2

This is it: the final boss on Tormented Souls 2. Beat this thing and you’ve completed the game, perhaps earning yourself the good ending if you’ve saved Miguel along the way. Like most bosses in the game, though, you’re not going to beat Nautilus by just shooting it.
To win this fight, you first need to take care of Nautilus’ tentacles. If a tentacle appears from the well in the centre of the arena, be prepared to dodge it as it sweeps around. The other tentacles you need to anticipate where they’ll slam and do your best to avoid them. When one of the tentacles drops and remains motionless for a short while, attack it with everything you’ve got until it’s destroyed.
Upon destroying a tentacle, the Nautilus will summon lightning bolts in an effort to hurt you. Just keep on the move to avoid them. After destroying all four tentacles the head of the Nautilus boss will drop. Run up and interact with it, then use your Crowbar to open it up, revealing an eye inside. Shoot it with the most powerful weapon you’ve got. The Hand Cannon is best.
The Nautilus’ head will rise again, and the tentacles will regrow. You now need to destroy them all again, with the added trouble of the Nautilus frequently shooting laser beams at you. Do your best to dodge them. After destroying all four tentacles the Nautilus will lower its head again. Shoot it with your most powerful weapon to finish it for good.
That’s it: you’ve completed the game. Well done! We hope you’ve found this walkthrough for Tormented Souls 2 useful. Look out for our next helpful guide.
Did you find this guide helpful? Please consider making a one-off donation to GameSpew. All money raised goes directly towards the running costs of the site and helps us continue to make guides, walkthroughs and more content.